Super impressed by VSCode's remote capabilities. Far better than many of its others.
Wednesday, July 22, 2020

Tuesday, June 04, 2019
Getting the ETW messages for a live running instance of a Service Fabric application
As our company has recently discovered, it would be very handy to have a live running stream of diagnostic from a live running Service Fabric application when one is trying to figure out why a Service won't start.
This docs.microsoft.com article provides a handy way to enable the log streaming feature in Visual Studio for a live running service in the same manner as one would get when debugging the Service Fabric Application in your local cluster.
This docs.microsoft.com article provides a handy way to enable the log streaming feature in Visual Studio for a live running service in the same manner as one would get when debugging the Service Fabric Application in your local cluster.
Friday, August 31, 2018
Solving NETSDK1061 build errors
Microsoft has changed a lot in the last 10 years, especially since Satya Nadella took over, and not for the better in many ways. One of the ways they've changed is that they've gotten a lot faster, which on the surface sounds good. When you start digging into the consequences of that change however, it's not so great: one of the ways in which that faster development velocity is enabled is by skipping over things I find to be essential, like documentation.
Today, the documentation that's missing from Microsoft's websites and negatively impacting me is how to keep the version of your dotnetcore 2.x+ SDKs "sticky" during your Visual Studio desktop builds and automated VSTS builds when Microsoft upgrades their SDKs. The very annoying thing is that Microsoft is going **so fast** that they're including beta and prerelease builds WITH VISUAL STUDIO!! That's a big no no as far as impacting one's customers in my book. The consequence of this is that you can upgrade Visual Studio, and what built with the previous version will no longer build with the current version. This results in builds errors with code:
NETSDK1061: The project was restored using Microsoft.NETCore.App version 2.1.3, but with current settings, version 2.1.3-servicing-26724-03 would be used instead. To resolve this issue, make sure the same settings are used for restore and for subsequent operations such as build or publish. Typically this issue can occur if the RuntimeIdentifier property is set during build or publish but not during restore. For more information, see https://aka.ms/dotnet-runtime-patch-selection.
Following the link in the error message, you're taken to documentation that tells you nothing useful about how to actually solve this error. Instead, you get to Google around and if you happen to find the right set of keywords and stumble across this documentation and read it **** VERY CAREFULLY **** you'll find that you need to make use of the "RuntimeFrameworkVersion" property that has to be specified in the .csproj project file of your dotnet core project, and you have to set that to the version you want to actually use for building your dotnet core project, in addition to a <PackageReference> element that looks similar to the following:
<PackageReference Update="Microsoft.NETCore.App" Version="2.1.2" />
The version in the above <PackageReference> element should match what you have in your <RuntimeFrameworkVersion> element.
Thursday, April 26, 2018
Project count and name length limitations of the Service Fabric tooling in Visual Studio
It would seem that I've just stumbled across the practical technical limit to how many services a Service Fabric application can have and still be debugged with Visual Studio: ~ 37. My problem would seem to be confirmed by this Github issue.
Tuesday, April 03, 2018
Accessing remoting exceptions and original causes of Exceptions in Service Fabric stateless/stateful services in v3.0+/v6.1+
The section "Remoting Exception Handling" on this docs.microsoft.com page appears to be the sum and total of the Service Fabric team's documentation on proper exception handling for Service Fabric remoting. It's two paragraphs. And it's completely insufficient bullshit.
What they fail to explain and be explicit about is the fact that Service Fabric takes WCF's exception handling capabilities to the extreme and handles all exceptions automatically by serializing them using DataContractSerializer, remoting them back to the caller, deserializing them on the caller and converting them back to .NET exceptions and making them accessible via the AggregateException.InnerException property in a try-catch block around a ServiceProxy / ActorProxy.Create<>() result's service method. Well, that's all well and good, except for the fact that according to multiple github.com issues for Service Fabric, the Service Fabric team broke the shit out of this nice facility in V2 remoting. So, now, we get to revert somewhat back to WCF's exception handling model, in the earlier days of WCF, and throw a FaultException<MyFault> where MyFault is your own custom DataContract serializable data contract object. Fantastic job boys and girls. When are you going to grow into your big person pants and fucking test things properly before releasing them ? #GettingSickAndFuckingTiredOfLazyAssUndiligentMillenialDevelopers
What they fail to explain and be explicit about is the fact that Service Fabric takes WCF's exception handling capabilities to the extreme and handles all exceptions automatically by serializing them using DataContractSerializer, remoting them back to the caller, deserializing them on the caller and converting them back to .NET exceptions and making them accessible via the AggregateException.InnerException property in a try-catch block around a ServiceProxy / ActorProxy.Create<>() result's service method. Well, that's all well and good, except for the fact that according to multiple github.com issues for Service Fabric, the Service Fabric team broke the shit out of this nice facility in V2 remoting. So, now, we get to revert somewhat back to WCF's exception handling model, in the earlier days of WCF, and throw a FaultException<MyFault> where MyFault is your own custom DataContract serializable data contract object. Fantastic job boys and girls. When are you going to grow into your big person pants and fucking test things properly before releasing them ? #GettingSickAndFuckingTiredOfLazyAssUndiligentMillenialDevelopers
Thursday, March 29, 2018
Enabling changes to Default Services within applications during deployment on a Service Fabric cluster
As it turns out, as of Service Fabric runtime 6.1, allowing applications to change their Default Services during an upgrade is not enabled by default. This can be controlled by the setting called 'EnableDefaultServicesUpgrade' in the cluster level setting group called 'ClusterManager'. This setting can be set in the Cluster Manifest if you're managing your own cluster on-premise, or it can be set in an ARM template if deploying to an Azure-based cluster like so:
{
"apiVersion": "2016-09-01",
"type": "Microsoft.ServiceFabric/clusters",
"name": "[parameters('clusterName')]",
"location": "[parameters('location')]",
"dependsOn": [
"[variables('supportLogStorageAccountName')]"
],
"properties": {
"certificate": {
"thumbprint": "[parameters('certificateThumbprint')]",
"x509StoreName": "[parameters('certificateStoreValue')]"
},
"clientCertificateCommonNames": [],
"clientCertificateThumbprints": [],
"clusterState": "Default",
"diagnosticsStorageAccountConfig": {
"blobEndpoint": "[reference(concat('Microsoft.Storage/storageAccounts/', variables('supportLogStorageAccountName')), '2017-06-01').primaryEndpoints.blob]",
"protectedAccountKeyName": "StorageAccountKey1",
"queueEndpoint": "[reference(concat('Microsoft.Storage/storageAccounts/', variables('supportLogStorageAccountName')), '2017-06-01').primaryEndpoints.queue]",
"storageAccountName": "[variables('supportLogStorageAccountName')]",
"tableEndpoint": "[reference(concat('Microsoft.Storage/storageAccounts/', variables('supportLogStorageAccountName')), '2017-06-01').primaryEndpoints.table]"
},
"fabricSettings": [
{
"parameters": [
{
"name": "ClusterProtectionLevel",
"value": "[parameters('clusterProtectionLevel')]"
}
],
"name": "Security"
},
{
"parameters": [
{
"name": "EnableDefaultServicesUpgrade",
"value": "[parameters('enableDefaultServicesUpgrade')]"
}
],
"name": "ClusterManager"
}
],
"managementEndpoint": "[concat('https://',reference(variables('lbIPName')).dnsSettings.fqdn,':',variables('nt0fabricHttpGatewayPort'))]",
"nodeTypes": [
{
"name": "[variables('vmNodeType0Name')]",
"applicationPorts": {
"endPort": "[variables('nt0applicationEndPort')]",
"startPort": "[variables('nt0applicationStartPort')]"
},
"clientConnectionEndpointPort": "[variables('nt0fabricTcpGatewayPort')]",
"durabilityLevel": "Bronze",
"ephemeralPorts": {
"endPort": "[variables('nt0ephemeralEndPort')]",
"startPort": "[variables('nt0ephemeralStartPort')]"
},
"httpGatewayEndpointPort": "[variables('nt0fabricHttpGatewayPort')]",
"isPrimary": true,
"vmInstanceCount": "[parameters('nt0InstanceCount')]"
}
],
"provisioningState": "Default",
"reliabilityLevel": "Silver",
"upgradeMode": "Automatic",
"vmImage": "Windows"
},
"tags": {
"resourceType": "Service Fabric",
"displayName": "IoT Service Fabric Cluster",
"clusterName": "[parameters('clusterName')]"
}
}
{
"apiVersion": "2016-09-01",
"type": "Microsoft.ServiceFabric/clusters",
"name": "[parameters('clusterName')]",
"location": "[parameters('location')]",
"dependsOn": [
"[variables('supportLogStorageAccountName')]"
],
"properties": {
"certificate": {
"thumbprint": "[parameters('certificateThumbprint')]",
"x509StoreName": "[parameters('certificateStoreValue')]"
},
"clientCertificateCommonNames": [],
"clientCertificateThumbprints": [],
"clusterState": "Default",
"diagnosticsStorageAccountConfig": {
"blobEndpoint": "[reference(concat('Microsoft.Storage/storageAccounts/', variables('supportLogStorageAccountName')), '2017-06-01').primaryEndpoints.blob]",
"protectedAccountKeyName": "StorageAccountKey1",
"queueEndpoint": "[reference(concat('Microsoft.Storage/storageAccounts/', variables('supportLogStorageAccountName')), '2017-06-01').primaryEndpoints.queue]",
"storageAccountName": "[variables('supportLogStorageAccountName')]",
"tableEndpoint": "[reference(concat('Microsoft.Storage/storageAccounts/', variables('supportLogStorageAccountName')), '2017-06-01').primaryEndpoints.table]"
},
"fabricSettings": [
{
"parameters": [
{
"name": "ClusterProtectionLevel",
"value": "[parameters('clusterProtectionLevel')]"
}
],
"name": "Security"
},
{
"parameters": [
{
"name": "EnableDefaultServicesUpgrade",
"value": "[parameters('enableDefaultServicesUpgrade')]"
}
],
"name": "ClusterManager"
}
],
"managementEndpoint": "[concat('https://',reference(variables('lbIPName')).dnsSettings.fqdn,':',variables('nt0fabricHttpGatewayPort'))]",
"nodeTypes": [
{
"name": "[variables('vmNodeType0Name')]",
"applicationPorts": {
"endPort": "[variables('nt0applicationEndPort')]",
"startPort": "[variables('nt0applicationStartPort')]"
},
"clientConnectionEndpointPort": "[variables('nt0fabricTcpGatewayPort')]",
"durabilityLevel": "Bronze",
"ephemeralPorts": {
"endPort": "[variables('nt0ephemeralEndPort')]",
"startPort": "[variables('nt0ephemeralStartPort')]"
},
"httpGatewayEndpointPort": "[variables('nt0fabricHttpGatewayPort')]",
"isPrimary": true,
"vmInstanceCount": "[parameters('nt0InstanceCount')]"
}
],
"provisioningState": "Default",
"reliabilityLevel": "Silver",
"upgradeMode": "Automatic",
"vmImage": "Windows"
},
"tags": {
"resourceType": "Service Fabric",
"displayName": "IoT Service Fabric Cluster",
"clusterName": "[parameters('clusterName')]"
}
}
Thursday, March 22, 2018
Troubleshooting connections to a service running in Service Fabric in Azure
Recently I decided to try deploying a Service Fabric cluster to Azure and investigate what it takes to create applications with Service Fabric. I used the default ARM template to deploy the cluster, with the parameters in the parameter file set appropriately. I've been able to successfully deploy the cluster itself, along with a private sample application that's showing as running and healthy within the cluster. (all of this with VSTS, but that's for another post). I'm now running into the problem of actually connecting to the Service.
When I use postman to connect to the service, I'm connecting to a URL like :
https://mycluster.westus.cloudapp.azure.com:8870/api/things
However, when I send my request, I instantly see Postman fail to connect:

Here's the steps taken when verifying all the settings so far:
When I use postman to connect to the service, I'm connecting to a URL like :
https://mycluster.westus.cloudapp.azure.com:8870/api/things
However, when I send my request, I instantly see Postman fail to connect:

Here's the steps taken when verifying all the settings so far:
- I got the address for my cluster from the "IP Address" resource that came with the ARM template that's in the Azure portal, using the "Copy" functionality.
- I've verified that the Load Balancer that was set up by the ARM template is correctly configured to use my application ports.
- I've consulted the documentation for Load Balancer health probes here to ensure that my machines are using the correct type of probe: https://docs.microsoft.com/en-ca/azure/load-balancer/load-balancer-custom-probe-overview#learn-about-the-types-of-probes . In my case, I don't want to use HTTP even though I've got an HTTP service because I'd need a 200 response. Instead, we use the more basic TCP probe which determines health status based on TCP handshake, which should be just fine.
- I've updated the Diagnostics lettings on the Load Balancer to pipe logs out to a storage account. Using the generated output, I've found that my health probe contradicts my expectations and is in fact failing. What's worse, there's a timing issue: the health probe fails too many times before the Service Fabric Host can startup on the VMs and then permanently marks the hosts as failed, preventing accessibility to any of my VMs, which would seem to explain my inability to connect to my services AND the speed with which the response is returned (because the traffic doesn't even get past the Load Balancer).
- I've used Remote Desktop to gain access to the Virtual Machine Scale Set VMs thanks to the default settings that came with the Service Fabric ARM template. Loading up PowerShell and executing the command "iwr -Method Get -Uri https://localhost:8870/api/Things" yields the error "iwr : The underlying connection was closed: An unexpected error occurred on a send". It would seem that I can't even get an actual connection to my service working on the local machine. This would explain why the health probes are failing: they're perfectly legit.
- Running the command "netstat -an | ? { $_ -like '*8870*' }" on the VMSS VM indicates that the Service Fabric Host has in fact launched my process on my expected port of 8870 and the process is listening on that port. Curiously, I'm also seeing an established connection on that port as well. This is at least somewhat consistent with the fact that the Service Fabric Management Portal is showing my service as healthy on all nodes, but inconsistent with the status of the health probe.
- Figuring that I now have a past problem that I already solved, I tried setting the permissions of the certificate stores for the certificates my API application uses. After some time waiting for the load balancer health probes to update, they were now able to connect and the services were running properly.
Saturday, January 20, 2018
General workflow for publishing an Android app to the Google Play store when developing with VSTS
- Create a Git repository (not TFVC) in VSTS, possibly with a new Team Project, up to you.
- Create your app in Android Studio and add it to the Git repository.
- Create your Key Store (or import an existing one) with Android Studio.
- In order to be able to sign your APK and deploy it (with any tool, but in this case VSTS), you'll need the following 3 pieces of information:
- The Key Store password
- The Key alias
- The Key password
- Ensure that you've imported the "Manifest Versioning Build Tasks" extension to your VSTS account from the VSTS Marketplace.
- Configure and execute an automated build for your application using the default steps provided by VSTS when creating a new build by applying the Android build template.
- Add to the default build templae a "Manifest Versioning Build Tasks" step to automatically generate your application version from the build.
- In your Google account, do the following:
- Ensure that you've gone to the Google Play Console page and created a Developer Page.
- Once you've created the Service Account below, you'll need to come back here to the Play Console and grant access with "RELEASE MANAGEMENT" permissions, ensuring that you also have the "Release manager" role selected.
- ENSURE THAT YOU'VE COMPLETED ALL THE WARNINGS IN THE NAVIGATION PANE IN THE GOOGLE PLAY CONSOLE, OTHERWISE YOU WON'T BE ABLE TO ROLL-OUT ANY OF YOUR RELEASES.
- Ensure that you've gone to the Google API Console and created a Service Account for publishing your app to the Google Play store.
- NOTE: You'll need to export your key in JSON format so that the email and key fields within the JSON object can be used to configure your Google Play endpoint in VSTS
- Ensure that you've imported the Microsoft "Google Play" extension into your VSTS account from the Marketplace.
- Configure your automated Release in VSTS. Execute the following steps:
- Add an "Android Signing" step to your release to sign one of the *unsigned* APKs from your build.
- Add a "Google Play - Release" step to your release. You'll need the keystore information mentioned above, as well as the keystore *.jks file to upload to VSTS in the "Google Play - Release" step.
- Now that your release is configured, you'll have to to a manual build on your developer (just once) to product a signed APK with the keystore, and then manually upload the signed APK file to the Google Play Console to an Alpha release in order to associate your applicationId (in the ApplicationManifest.xml app manifest file) to your product in the Play Store.
Friday, January 12, 2018
Bootstrapping a VSTS Linux build agent for Docker containers
1. Create an Ubuntu 17.04 VM in Azure
2. Install dotnetcore using the instructions here.
3. Install the Docker apt-get package using the instructions here.
4. Download and run the VSTS agent Docker image and run it as a Docker container itself using the instructions here, e.g. sudo docker run -e VSTS_ACCOUNT=myvstsaccountname -e VSTS_TOKEN=abcdtokenherefromportal -e VSTS_POOL="Docker Build Agents" -e VSTS_AGENT="myagentname" -it -v /var/run/docker.sock:/var/run/docker.sock microsoft/vsts-agent
2. Install dotnetcore using the instructions here.
3. Install the Docker apt-get package using the instructions here.
4. Download and run the VSTS agent Docker image and run it as a Docker container itself using the instructions here, e.g. sudo docker run -e VSTS_ACCOUNT=myvstsaccountname -e VSTS_TOKEN=abcdtokenherefromportal -e VSTS_POOL="Docker Build Agents" -e VSTS_AGENT="myagentname" -it -v /var/run/docker.sock:/var/run/docker.sock microsoft/vsts-agent
Tuesday, January 09, 2018
Using Git with a corporate firewall that uses certificate interception
Like many open source tools (originally or completely) based on Linux, git has issues with self-signed certificates, especially if you work in a corporate environment where your company may have network message inspection hardware for security. To get git to work in such an environment, you'll need the public root Certificate Authority certificate for your company, exported to a base 64 .cer file. Once you have that, run the following command to install it into git's private certificate store:
git config --global http.sslCAInfo "<path/to/your/certfile.cer or .pem>"
git config --global http.sslCAInfo "<path/to/your/certfile.cer or .pem>"
Wednesday, January 03, 2018
Using NodeJS with a corporate firewall that uses certificate interception
See this post on Stack Overflow. The gist of it:
1. Export your company's corporate Root CA certificate to a Base64 encoded .cer file
2. Run this command to instruct npm to use the certificate file in its communications:
1. Export your company's corporate Root CA certificate to a Base64 encoded .cer file
2. Run this command to instruct npm to use the certificate file in its communications:
npm config set cafile = "<path to your certificate file>"Tuesday, December 12, 2017
Installing Windows 10 IoT Core on a Raspberry Pi 3
You’ll need the following ingredients:
1. A desktop or laptop computer with Windows 10 installed
2. A Raspberry Pi 3.
3. A Micro-SD card for use as the primary storage on the RasPi3
4. A Micro-USB cable for connecting the RasPi3 to a power sources
5. A mouse and keyboard
6. A monitor with HDMI support, or an HDMI to [whatever] adapter for your monitor
7. A wired network connection for the RasPi3.
To get up and running with Windows 10 IoT Core on a Raspberry Pi 3, you’ll need to follow these high-level steps:
1. Ensure you’ve got Windows 10 on your developer machine. If you don’t, go get a machine with Windows 10 and don’t come back here until you do.
2. Download the Windows 10 Iot Core Dashboard . You’ll need it to configure your Micro SD card for the RasPi 3.
3. Insert the Micro-SD card into your computer and use the IoT Core Dashboard to configure the MicroSD card with Windows 10 IoT Core.
4. Once successful, insert the MicroSD card into the unpowered RasPi3 and plug it in to power it up. 5. You should also have your monitor, mouse and keyboard hooked up by this point.
6. Configure the RasPi3 to connect to your network, and ensure that your Desktop computer with the dashboard and the RasPi3 are on the same network so that the Dashboard can detect your RasPi3.
7. Use the Windows 10 IoT Core Dashboard on your desktop PC to connect the RasPi3 to an IoT Hub in Azure.
1. A desktop or laptop computer with Windows 10 installed
2. A Raspberry Pi 3.
3. A Micro-SD card for use as the primary storage on the RasPi3
4. A Micro-USB cable for connecting the RasPi3 to a power sources
5. A mouse and keyboard
6. A monitor with HDMI support, or an HDMI to [whatever] adapter for your monitor
7. A wired network connection for the RasPi3.
To get up and running with Windows 10 IoT Core on a Raspberry Pi 3, you’ll need to follow these high-level steps:
1. Ensure you’ve got Windows 10 on your developer machine. If you don’t, go get a machine with Windows 10 and don’t come back here until you do.
2. Download the Windows 10 Iot Core Dashboard . You’ll need it to configure your Micro SD card for the RasPi 3.
3. Insert the Micro-SD card into your computer and use the IoT Core Dashboard to configure the MicroSD card with Windows 10 IoT Core.
4. Once successful, insert the MicroSD card into the unpowered RasPi3 and plug it in to power it up. 5. You should also have your monitor, mouse and keyboard hooked up by this point.
6. Configure the RasPi3 to connect to your network, and ensure that your Desktop computer with the dashboard and the RasPi3 are on the same network so that the Dashboard can detect your RasPi3.
7. Use the Windows 10 IoT Core Dashboard on your desktop PC to connect the RasPi3 to an IoT Hub in Azure.
Sunday, November 12, 2017
The quick and dirty for using System.Windows.Interactivity and the MVVM pattern for custom dialogs in your WPF application
So I recently decided to finally try my hand at using proper MVVM patterns with my custom dialogs in the application on which I'm currently working (started back in 2010 before a lot of MVVM frameworks existed). I followed Microsoft's Interactivity Getting-started guide here. The quick summary of steps to take (as a reminder) are below. That said, read the article tip-to-tail so that you understand these steps, and then use this page as a reminder.
- For your dialog (e.g. MyDialog), you'll need to create the following items:
- MyDialogViewModel, which implements Prism.Interactivity.InteractionRequest.IInteractionRequestAware
- MyDialogConfirmation, which extends from Prism.Interactivity.InteractionRequest.Confirmation
- In your dialog, ensure that it extends from System.Windows.Control.UserControl, NOT System.Windows.Window (because your interactivity request handler in XAML needs a control for its Content, not a Window)
- In the constructor of your Dialog user control, set your data context to a new instance of your MyDialogViewModel (to ensure that it's present in the DataContext when the Interactivity framework invokes your dialog's window and can inject it with your MyDialogConfirmation instance when you raise the notification for your InteractivityRequest to which you're binding
- Ensure you've created your interactivity handler in the XAML of the view that's calling your dialog, e.g.:
<i:Interaction.Triggers>
  <prism:InteractionRequestTrigger SourceObject="{Binding Path=MyDialogInteractivityRequestProperty, Mode=OneWay}">
   <prism:PopupWindowAction IsModal="True" CenterOverAssociatedObject="True">
    <prism:PopupWindowAction.WindowContent>
     <Dialogs:MyDialog />
    </prism:PopupWindowAction.WindowContent>
   </prism:PopupWindowAction>
  </prism:InteractionRequestTrigger>
 </i:Interaction.Triggers>
Wednesday, October 18, 2017
A quirk when using Ninject with Self-Hosted WCF services
I recently discovered a problem when using WCF in a self-hosted setup that I had never encountered before:
I was using the following binding syntax in my module:
this.Bind<IMyService, MyServiceImpl>();
As it turned out, this was causing a strange "Object reference not set to instance of an object". Changing the syntax to :
this.Bind<IMyService>().To<MyServiceImpl>().InTransientScope();
... solved the problem.
I was using the following binding syntax in my module:
this.Bind<IMyService, MyServiceImpl>();
As it turned out, this was causing a strange "Object reference not set to instance of an object". Changing the syntax to :
this.Bind<IMyService>().To<MyServiceImpl>().InTransientScope();
... solved the problem.
Using Ninject in a Self-Hosted environment, e.g. a Windows Service
Windows Services are a great way to host WCF, typically in scenarios where on-premise services are a requirement. As Dependency Injection becomes a standard practice in large scale systems, it can be hard to choose the right DI container. One of my personal favourites in Ninject because of its (typical) ease of configuration. Some benchmarks will show that Ninject isn't the fastest container out there in terms of constructing objects, but in practical use I've never once found that to be a problem.
The following example shows a function that can be used in a Windows Service for setting up Ninject to create ServiceHost instances in a self-hosting scenario:
private static NinjectServiceHost CreateServiceHost(IKernel standardKernel, Type serviceType)
{
 if (standardKernel == null)
 {
  throw new ArgumentNullException("standardKernel");
 }

 if (serviceType == null)
 {
  throw new ArgumentNullException("serviceType");
 }

 NinjectServiceHost ninjectServiceHost = new NinjectServiceHost(
  serviceBehavior: new NinjectServiceBehavior(
   instanceProviderFactory: type => new NinjectInstanceProvider(type, standardKernel),
   requestScopeCleanUp: new WcfRequestScopeCleanup(true)
   ),
  serviceType: serviceType
 );

 return ninjectServiceHost;
}
This function will be good enough to boot strap your services in your Windows ServiceBase
implementation in the vast majority of cases. You need only pass in your pre-configured
IKernel instance and the Type of the WCF Service implementation.
Friday, October 13, 2017
Resolving PowerShell cmdlets with conflicting names
I've recently run into the issue of needing to use multiple modules that happen to contain cmdlets that have the same name in each. According to this article, you can use module name qualified cmdlet calls to resolve naming conflicts.
Tuesday, September 26, 2017
Loading the Solver add-in for Excel so that you can perform graphical analysis of charts
For starters, see here. For the quick start version, see here:
- File => Options => Add-ins
- Check "Active Application Add-ins" first to see if it's already loaded. If "Solver Add-in" is not in there, search under "Inactive Application Add-ins"
- Near the bottom of the window, under the "Manage" drop-down, select "Excel Add-ins" and hit the Go button.
- Ensure the "Solver Add-in" button is checked off, then click the "Ok" button and save all the way back to your workbook.
Monday, September 25, 2017
How to include multiple Earned Value charts on the same graph
- Ensure that you have your Earned Value data series all in the same workbook
- Ensure that the date series' for your Earned Value series are actually formatted as dates
- Start by rendering the first Earned Value series as a SCATTER PLOT with straight lines
- Edit the chart data to add subsequent Earned Value series until they're all on the same chart
TODO: Update this post to include screen shots.
How to quickly graph a comparison of projects with PDEx in Excel 2016
- Select your projects in Windows Explorer, right click => Open
- Once all of your projects are loaded into an instance of Microsoft Project with PDEx installed, go to the "Project Design" tab and click on "Compare":

- In the window that opens up to compare your Projects, go to the Summary tab:

- Click somewhere in the table of values and press Ctrl+A to select all of the cells:

- Press Ctrl+C to copy the contents of the table to the clipboard.
- Open a new Excel workbook, and on a blank worksheet, go to cell A1:

- Press Ctrl+V to paste the table of values from MS Project into Excel:

- Select a SINGLE column of data across projects that you'd like to graph and click on the quick action icon in the bottom right, e.g. Total Cost:

- In the Quick Action dialog that appears, select the "Charts" tab:

- Click on the "Scatter" chart type to generate a Scatter plot of the data points. This will generate the series on the Y-axis, with default serial numbers as the X-axis:

- Right click on the chart and select "Edit Data" to edit the data series:

- In the "Select Data Source" dialog that appears, select the created data series and click on the "Edit" button to edit it:

- In the "Edit Series" dialog that appears, select the cell that's to be used for the series name, and the range of cells that are to be used as the X-axis for the data series. Then click Ok to save the changes, and OK again to close the Series editor:

- Once back in the main Excel window, with the Chart still in Edit mode, go to the top right of the data area and hover over the corner until you have an "Expand" mouse cursor:

- Click on the corner anchor and drag to the right to include extra data series extracted from the neighbouring columns:

- Now that you've got all of the series you want to include on the graph (Cost in our case), you'll need to pare down the X-axis to have the series' fill out the chart. Right-click on the X-axis and select Format Axis:

- In the "Format Axis" pane that appears on the right side of the Excel window, set appropriate X-axis bounds:

- In order to match the graphs we see in the Project Design manual which include data labels that have the names of the corresponding project variants, start by right-clicking on one of the data series and then clicking on "Add Data Labels":

- This will add default data labels with the Y-values of the data points to the series. However, we want to use the names of the corresponding projects, so we have more work to do. Right-click on one of the data labels and click on "Format Data Labels ...":
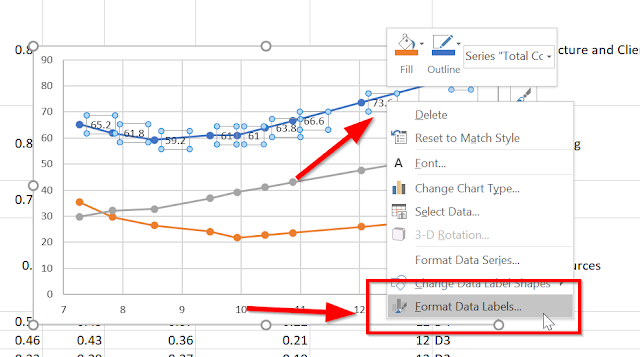
- In the "Format Data Labels" pane that appears on the right side of the Excel window, select "Value from Cells". This will cause the "Data Label Range" dialog to appear:

- Click on the textbox in the "Data Label Range", then select the cells under the "Project" column, EXCLUDING THE "PROJECT" HEADER. Then click OK:

- You'll now have your chart for your project comparison data, with (at least one) series set up to look just like the Project Design manual:


Happy charting!
Saturday, September 16, 2017
The Tech Lead's New Project Checklist, propagated
A while ago a virtual colleague recommended this article on a forum:
https://insimpleterms.blog/2017/08/07/the-tech-leads-new-project-checklist/
It's a checklist for all the items a Technical Lead should enumerate on a New Project. It's a good read if you're in (or could potentially be in) the position of leading a team in a technical project.
https://insimpleterms.blog/2017/08/07/the-tech-leads-new-project-checklist/
It's a checklist for all the items a Technical Lead should enumerate on a New Project. It's a good read if you're in (or could potentially be in) the position of leading a team in a technical project.
Subscribe to:
Posts (Atom)