You’ll need the following ingredients:
1. A desktop or laptop computer with Windows 10 installed
2. A Raspberry Pi 3.
3. A Micro-SD card for use as the primary storage on the RasPi3
4. A Micro-USB cable for connecting the RasPi3 to a power sources
5. A mouse and keyboard
6. A monitor with HDMI support, or an HDMI to [whatever] adapter for your monitor
7. A wired network connection for the RasPi3.
To get up and running with Windows 10 IoT Core on a Raspberry Pi 3, you’ll need to follow these high-level steps:
1. Ensure you’ve got Windows 10 on your developer machine. If you don’t, go get a machine with Windows 10 and don’t come back here until you do.
2. Download the Windows 10 Iot Core Dashboard . You’ll need it to configure your Micro SD card for the RasPi 3.
3. Insert the Micro-SD card into your computer and use the IoT Core Dashboard to configure the MicroSD card with Windows 10 IoT Core.
4. Once successful, insert the MicroSD card into the unpowered RasPi3 and plug it in to power it up. 5. You should also have your monitor, mouse and keyboard hooked up by this point.
6. Configure the RasPi3 to connect to your network, and ensure that your Desktop computer with the dashboard and the RasPi3 are on the same network so that the Dashboard can detect your RasPi3.
7. Use the Windows 10 IoT Core Dashboard on your desktop PC to connect the RasPi3 to an IoT Hub in Azure.
Tuesday, December 12, 2017

Sunday, November 12, 2017
The quick and dirty for using System.Windows.Interactivity and the MVVM pattern for custom dialogs in your WPF application
So I recently decided to finally try my hand at using proper MVVM patterns with my custom dialogs in the application on which I'm currently working (started back in 2010 before a lot of MVVM frameworks existed). I followed Microsoft's Interactivity Getting-started guide here. The quick summary of steps to take (as a reminder) are below. That said, read the article tip-to-tail so that you understand these steps, and then use this page as a reminder.
- For your dialog (e.g. MyDialog), you'll need to create the following items:
- MyDialogViewModel, which implements Prism.Interactivity.InteractionRequest.IInteractionRequestAware
- MyDialogConfirmation, which extends from Prism.Interactivity.InteractionRequest.Confirmation
- In your dialog, ensure that it extends from System.Windows.Control.UserControl, NOT System.Windows.Window (because your interactivity request handler in XAML needs a control for its Content, not a Window)
- In the constructor of your Dialog user control, set your data context to a new instance of your MyDialogViewModel (to ensure that it's present in the DataContext when the Interactivity framework invokes your dialog's window and can inject it with your MyDialogConfirmation instance when you raise the notification for your InteractivityRequest to which you're binding
- Ensure you've created your interactivity handler in the XAML of the view that's calling your dialog, e.g.:
<i:Interaction.Triggers>
  <prism:InteractionRequestTrigger SourceObject="{Binding Path=MyDialogInteractivityRequestProperty, Mode=OneWay}">
   <prism:PopupWindowAction IsModal="True" CenterOverAssociatedObject="True">
    <prism:PopupWindowAction.WindowContent>
     <Dialogs:MyDialog />
    </prism:PopupWindowAction.WindowContent>
   </prism:PopupWindowAction>
  </prism:InteractionRequestTrigger>
 </i:Interaction.Triggers>
Wednesday, October 18, 2017
A quirk when using Ninject with Self-Hosted WCF services
I recently discovered a problem when using WCF in a self-hosted setup that I had never encountered before:
I was using the following binding syntax in my module:
this.Bind<IMyService, MyServiceImpl>();
As it turned out, this was causing a strange "Object reference not set to instance of an object". Changing the syntax to :
this.Bind<IMyService>().To<MyServiceImpl>().InTransientScope();
... solved the problem.
I was using the following binding syntax in my module:
this.Bind<IMyService, MyServiceImpl>();
As it turned out, this was causing a strange "Object reference not set to instance of an object". Changing the syntax to :
this.Bind<IMyService>().To<MyServiceImpl>().InTransientScope();
... solved the problem.
Using Ninject in a Self-Hosted environment, e.g. a Windows Service
Windows Services are a great way to host WCF, typically in scenarios where on-premise services are a requirement. As Dependency Injection becomes a standard practice in large scale systems, it can be hard to choose the right DI container. One of my personal favourites in Ninject because of its (typical) ease of configuration. Some benchmarks will show that Ninject isn't the fastest container out there in terms of constructing objects, but in practical use I've never once found that to be a problem.
The following example shows a function that can be used in a Windows Service for setting up Ninject to create ServiceHost instances in a self-hosting scenario:
private static NinjectServiceHost CreateServiceHost(IKernel standardKernel, Type serviceType)
{
 if (standardKernel == null)
 {
  throw new ArgumentNullException("standardKernel");
 }

 if (serviceType == null)
 {
  throw new ArgumentNullException("serviceType");
 }

 NinjectServiceHost ninjectServiceHost = new NinjectServiceHost(
  serviceBehavior: new NinjectServiceBehavior(
   instanceProviderFactory: type => new NinjectInstanceProvider(type, standardKernel),
   requestScopeCleanUp: new WcfRequestScopeCleanup(true)
   ),
  serviceType: serviceType
 );

 return ninjectServiceHost;
}
This function will be good enough to boot strap your services in your Windows ServiceBase
implementation in the vast majority of cases. You need only pass in your pre-configured
IKernel instance and the Type of the WCF Service implementation.
Friday, October 13, 2017
Resolving PowerShell cmdlets with conflicting names
I've recently run into the issue of needing to use multiple modules that happen to contain cmdlets that have the same name in each. According to this article, you can use module name qualified cmdlet calls to resolve naming conflicts.
Tuesday, September 26, 2017
Loading the Solver add-in for Excel so that you can perform graphical analysis of charts
For starters, see here. For the quick start version, see here:
- File => Options => Add-ins
- Check "Active Application Add-ins" first to see if it's already loaded. If "Solver Add-in" is not in there, search under "Inactive Application Add-ins"
- Near the bottom of the window, under the "Manage" drop-down, select "Excel Add-ins" and hit the Go button.
- Ensure the "Solver Add-in" button is checked off, then click the "Ok" button and save all the way back to your workbook.
Monday, September 25, 2017
How to include multiple Earned Value charts on the same graph
- Ensure that you have your Earned Value data series all in the same workbook
- Ensure that the date series' for your Earned Value series are actually formatted as dates
- Start by rendering the first Earned Value series as a SCATTER PLOT with straight lines
- Edit the chart data to add subsequent Earned Value series until they're all on the same chart
TODO: Update this post to include screen shots.
How to quickly graph a comparison of projects with PDEx in Excel 2016
- Select your projects in Windows Explorer, right click => Open
- Once all of your projects are loaded into an instance of Microsoft Project with PDEx installed, go to the "Project Design" tab and click on "Compare":

- In the window that opens up to compare your Projects, go to the Summary tab:

- Click somewhere in the table of values and press Ctrl+A to select all of the cells:

- Press Ctrl+C to copy the contents of the table to the clipboard.
- Open a new Excel workbook, and on a blank worksheet, go to cell A1:

- Press Ctrl+V to paste the table of values from MS Project into Excel:

- Select a SINGLE column of data across projects that you'd like to graph and click on the quick action icon in the bottom right, e.g. Total Cost:

- In the Quick Action dialog that appears, select the "Charts" tab:

- Click on the "Scatter" chart type to generate a Scatter plot of the data points. This will generate the series on the Y-axis, with default serial numbers as the X-axis:

- Right click on the chart and select "Edit Data" to edit the data series:

- In the "Select Data Source" dialog that appears, select the created data series and click on the "Edit" button to edit it:

- In the "Edit Series" dialog that appears, select the cell that's to be used for the series name, and the range of cells that are to be used as the X-axis for the data series. Then click Ok to save the changes, and OK again to close the Series editor:

- Once back in the main Excel window, with the Chart still in Edit mode, go to the top right of the data area and hover over the corner until you have an "Expand" mouse cursor:

- Click on the corner anchor and drag to the right to include extra data series extracted from the neighbouring columns:

- Now that you've got all of the series you want to include on the graph (Cost in our case), you'll need to pare down the X-axis to have the series' fill out the chart. Right-click on the X-axis and select Format Axis:

- In the "Format Axis" pane that appears on the right side of the Excel window, set appropriate X-axis bounds:

- In order to match the graphs we see in the Project Design manual which include data labels that have the names of the corresponding project variants, start by right-clicking on one of the data series and then clicking on "Add Data Labels":

- This will add default data labels with the Y-values of the data points to the series. However, we want to use the names of the corresponding projects, so we have more work to do. Right-click on one of the data labels and click on "Format Data Labels ...":
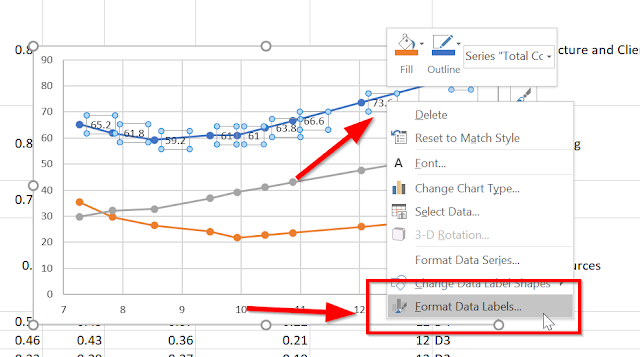
- In the "Format Data Labels" pane that appears on the right side of the Excel window, select "Value from Cells". This will cause the "Data Label Range" dialog to appear:

- Click on the textbox in the "Data Label Range", then select the cells under the "Project" column, EXCLUDING THE "PROJECT" HEADER. Then click OK:

- You'll now have your chart for your project comparison data, with (at least one) series set up to look just like the Project Design manual:


Happy charting!
Saturday, September 16, 2017
The Tech Lead's New Project Checklist, propagated
A while ago a virtual colleague recommended this article on a forum:
https://insimpleterms.blog/2017/08/07/the-tech-leads-new-project-checklist/
It's a checklist for all the items a Technical Lead should enumerate on a New Project. It's a good read if you're in (or could potentially be in) the position of leading a team in a technical project.
https://insimpleterms.blog/2017/08/07/the-tech-leads-new-project-checklist/
It's a checklist for all the items a Technical Lead should enumerate on a New Project. It's a good read if you're in (or could potentially be in) the position of leading a team in a technical project.
Wednesday, September 06, 2017
Useful PowerPoint Shit, Part 2 - Cloning objects quickly
I don't like using the mouse, but if I have to I will. Here's some tips for quickly cloning items in PowerPoint:
- Duplicating a shape - Ctrl+C, Ctrl+V OR Ctrl+D (while not in text edit mode) OR Ctrl+Mouse drag
- Duplicating a slide - Ctrl+Shift+D
Useful PowerPoint Shit, Part 1 - Copying and Pasting Shape Attributes
I love using hotkeys to execute my tasks because they reduce the number of times my hand has to leave the keyboard and go for the mouse, and consequently accelerate the task at hand. I've recently had cause to start using PowerPoint a lot more as my role at the company where I work has shifted and my job description has changed somewhat.
That said, I've discovered this useful gem for copying attributes between shapes so that I don't have to use the mouse and navigate menus to clone items or otherwise search for paste options:
That said, I've discovered this useful gem for copying attributes between shapes so that I don't have to use the mouse and navigate menus to clone items or otherwise search for paste options:
Copy the attributes of a shape
- Select the shape with the attributes that you want to copy. ...
- Press CTRL+SHIFT+C to copy the shape attributes.
- Press the TAB key or SHIFT+TAB to select the shape or object that you want to copy the attributes to.
- Press CTRL+SHIFT+V.
Here's the keyboard reference for Microsoft PowerPoint.
Thursday, August 31, 2017
Fixing github access behind a corporate firewall with self-signed certificates
If you're doing development with bower packages in Visual Studio projects behind a corporate firewall, you may have run into issues with self-signed certificates. The quickest and easiest way to get around this (though definitely not safest or most recommended) is to simply globally ignore self-signed certificates.
On your Developer Command Prompt (assuming you've got 'git' in your PATH):
git config --global http.sslverify false
On your Developer Command Prompt (assuming you've got 'git' in your PATH):
git config --global http.sslverify false
Fixing Bower behind a corporate firewall
Our company uses software to intercept and inspect encrypted packets (like many other corporate entities). As a result, there are self-signed certificates added to the packets. This creates a problem with many package managers like npm and bower.
If you're looking to get started quickly with bower in your .NET application in Visual Studio, simply put a .bowerrc file with the following contents in the root of your project (next to, say, your web.config):
If you're looking to get started quickly with bower in your .NET application in Visual Studio, simply put a .bowerrc file with the following contents in the root of your project (next to, say, your web.config):
{ "strict-ssl": false }
Sunday, August 13, 2017
Azure Automation does not support the Process{} block
There's an undocumented bug in Azure Automation: it does NOT support the Process { } block, i.e. the block that you would use when creating scripts / modules where you need to support piping in your commands.
I discovered this after much trial and error trying to run a runbook and having it silently and mysteriously fail with no output whatsoever, no matter what verbosity and progress settings I enabled.
I discovered this after much trial and error trying to run a runbook and having it silently and mysteriously fail with no output whatsoever, no matter what verbosity and progress settings I enabled.
Re-adding a Hybrid Runbook Worker to an Automation Account runbook worker group
If you receive the error: Add-HybridRunbookWorker : Machine is already registered to different account
Simply delete the key under: HKEY_LOCAL_MACHINE\SOFTWARE\Microsoft\HybridRunbookWorker and try the command again.
Thanks go to Wayne Hoggett for pointing this out, this point reprints his.
Simply delete the key under: HKEY_LOCAL_MACHINE\SOFTWARE\Microsoft\HybridRunbookWorker and try the command again.
Thanks go to Wayne Hoggett for pointing this out, this point reprints his.
Sunday, July 30, 2017
Unit testing Service Fabric Reliable Service and Actors with Mocks and Moqs
Install-Package Moq
Install-Package ServiceFabric.Mocks
Some key bits of code you'll need:
this.mockRepository = new MockRepository(MockBehavior.Strict);
var statefulServiceContext = MockStatefulServiceContextFactory.Create(
codePackageActivationContext: this.mockRepository.Create<ICodePackageActivationContext>().Object,
serviceTypeName: String.Concat(typeof(MyActorService).Name, "Type"),
serviceName: new Uri("fabric:/MockApplicationType/MyActorServiceType"),
partitionId: Guid.NewGuid(),
replicaId: 1
);
this.mockServiceDependencyThing = this.mockRepository.Create<IServiceDependencyThing>();
MockActorService<MyActorService> actorServiceForActor = MockActorServiceFactory.CreateActorServiceForActor<MyActorService>((actorService, actorId) => new MyActorService(actorService, actorId, this.mockServiceDependencyThing.Object));
this.sut = new MyActorService(actorServiceForActor, new ActorId(Guid.NewGuid()), this.mockServiceDependencyThing.Object);
Install-Package ServiceFabric.Mocks
Some key bits of code you'll need:
this.mockRepository = new MockRepository(MockBehavior.Strict);
var statefulServiceContext = MockStatefulServiceContextFactory.Create(
codePackageActivationContext: this.mockRepository.Create<ICodePackageActivationContext>().Object,
serviceTypeName: String.Concat(typeof(MyActorService).Name, "Type"),
serviceName: new Uri("fabric:/MockApplicationType/MyActorServiceType"),
partitionId: Guid.NewGuid(),
replicaId: 1
);
this.mockServiceDependencyThing = this.mockRepository.Create<IServiceDependencyThing>();
MockActorService<MyActorService> actorServiceForActor = MockActorServiceFactory.CreateActorServiceForActor<MyActorService>((actorService, actorId) => new MyActorService(actorService, actorId, this.mockServiceDependencyThing.Object));
this.sut = new MyActorService(actorServiceForActor, new ActorId(Guid.NewGuid()), this.mockServiceDependencyThing.Object);
Thursday, July 27, 2017
Adding Dependency Injection support for Service Fabric Stateful Services and Actors
Check this page out: https://alexmg.com/introducing-the-autofac-integration-for-service-fabric/
Right from the maker of Autofac. You'll need to import the Autofac.ServiceFabric NuGet package, which is currently in beta.
Note: As of the current version (1.0.0-beta1) the InternalsVisibleTo functionality mentioned in the article doesn't work, so you ** HAVE TO ** set your registered Actors and Reliable Services to "public" visibility.
Note 2: The dependencies on the Autofac.ServiceFabric NuGet package aren't set correctly, so you'll have to "Update-Package Autofac -Version 4.6.0" since 4.5.0 isn't good enough.
Right from the maker of Autofac. You'll need to import the Autofac.ServiceFabric NuGet package, which is currently in beta.
Note: As of the current version (1.0.0-beta1) the InternalsVisibleTo functionality mentioned in the article doesn't work, so you ** HAVE TO ** set your registered Actors and Reliable Services to "public" visibility.
Note 2: The dependencies on the Autofac.ServiceFabric NuGet package aren't set correctly, so you'll have to "Update-Package Autofac -Version 4.6.0" since 4.5.0 isn't good enough.
Adding Dependency Injection support for Service Fabric Stateless API applications
Turns out that it's pretty easy (for Stateless Services anyway).
In your Package Manager Console:
Install-Package Autofac.WebApi2 -Version 4.0.1
In your Startup.cs file (assuming you're using the Visual Studio Project templates):
Startup.cs:
public static void ConfigureApp(IAppBuilder appBuilder)
{
// Configure Web API for self-host.
HttpConfiguration config = new HttpConfiguration();
config.Routes.MapHttpRoute(
name: "DefaultApi",
routeTemplate: "api/{controller}/{id}",
defaults: new { id = RouteParameter.Optional }
);
var containerBuilder = new ContainerBuilder();
containerBuilder.RegisterModule<MyApiModule>();
config.DependencyResolver = new AutofacWebApiDependencyResolver(containerBuilder.Build());
appBuilder.UseWebApi(config);
}
In your Package Manager Console:
Install-Package Autofac.WebApi2 -Version 4.0.1
In your Startup.cs file (assuming you're using the Visual Studio Project templates):
Startup.cs:
public static void ConfigureApp(IAppBuilder appBuilder)
{
// Configure Web API for self-host.
HttpConfiguration config = new HttpConfiguration();
config.Routes.MapHttpRoute(
name: "DefaultApi",
routeTemplate: "api/{controller}/{id}",
defaults: new { id = RouteParameter.Optional }
);
var containerBuilder = new ContainerBuilder();
containerBuilder.RegisterModule<MyApiModule>();
config.DependencyResolver = new AutofacWebApiDependencyResolver(containerBuilder.Build());
appBuilder.UseWebApi(config);
}
And, assuming you've built an Autofac Module, it should look something vaguely like this:
public class PlayDatesApiModule : Autofac.Module
{
protected override void Load(ContainerBuilder builder)
{
base.Load(builder);
builder.RegisterType<MyDependencyConcreteType>().As<IMyDependency>();
builder.RegisterType<ValuesController>();
}
}
Tuesday, July 18, 2017
Adding Azure Active Directory OAuth 2.0 authentication to a Service Fabric Web API (Stateless) service
... is pretty much the same as adding it to a normal Web API 2.0 application:
[Authorize]
public class ValuesController : ApiController
{
[Authorize]
public class ValuesController : ApiController
{
}
Then in your Startup.cs file:
// This code configures Web API. The Startup class is specified as a type
// parameter in the WebApp.Start method.
public static void ConfigureApp(IAppBuilder appBuilder)
{
CodePackageActivationContext activationContext = FabricRuntime.GetActivationContext();
ConfigurationPackage configurationPackageObject = activationContext.GetConfigurationPackageObject("Config");
ConfigurationSection configurationSection = configurationPackageObject.Settings.Sections["ActiveDirectoryServiceConfigSection"];
appBuilder.UseWindowsAzureActiveDirectoryBearerAuthentication(
new WindowsAzureActiveDirectoryBearerAuthenticationOptions
{
Tenant = configurationSection.Parameters["TenantName"].Value,
TokenValidationParameters = new TokenValidationParameters
{
ValidAudience = configurationSection.Parameters["AppIdUri"].Value
},
Provider = new OAuthBearerAuthenticationProvider
{
OnValidateIdentity = OnValidateUserIdentityAsync
}
});
// Configure Web API for self-host.
HttpConfiguration config = new HttpConfiguration();
config.Routes.MapHttpRoute(
name: "DefaultApi",
routeTemplate: "api/{controller}/{id}",
defaults: new { id = RouteParameter.Optional }
);
appBuilder.UseWebApi(config);
}
The trick here is to ** ENSURE THAT WAAD BEARER AUTHENTICATION GETS REGISTERED BEFORE REGISTERING WEB API!!! **
Sunday, July 16, 2017
Getting Started with deploying your first Azure Service Fabric resource
I've recently started getting on the Service Fabric band wagon, running in Azure in my case. When you run Service Fabric in Azure (vs on-prem), things are a little bit different. Instead of running your own manager tool on some machine (most likely virtual), it's provided for you as a resource in the Azure Resource Manager. To get started with Service Fabric in Azure, I kicked things off by running the ARM template available in the Azure Quick starts on github.
I started off by putting the template into source control and then creating a VSTS build and automated release for the template. Before you can run the template as it is on Github (at the time of this writing) you'll need to have the following pre-requisites:
I started off by putting the template into source control and then creating a VSTS build and automated release for the template. Before you can run the template as it is on Github (at the time of this writing) you'll need to have the following pre-requisites:
- A pre-existing key vault
- An X509 certificate populated in that key vault, stored as a .PFX file with a password to secure it.
In my case, I made up a separate resource group template to set all that up and stage it before executing the resource group template for the Service Fabric manager and it's associated VMs that would provide the nodes for the Fabric.
Once the templates were successfully executed and I had my resources created, I discovered a few more things that needed to be done before an App could be deployed to the fabric:
- In the Virtual Machine Scale Set that gets created by the template, you have to go turn the VMSS on in the portal! ** It's not turned on by default ! **
- As soon as the VMSS is turned on for the first time and starts connecting to the Service Fabric, it immediately starts an upgrade to the latest version of the Fabric. DO NOT TURN OFF THE VMSS DURING THIS TIME! OR YOU'LL HAVE TO START OVER. You can track the progress of the update during this initial start up using the following powershell snippet. As soon as the 'ClusterState' is 'Ready', you can start executing other operations:
- $resourceGroupName = 'myresourcegroup'; $clusterName = 'mycluster'; Get-AzureRmServiceFabricCluster -ResourceGroupName $resourceGroupName -Name $clusterName | select -Property Name,ClusterState,ManagementEndpoint
- In order to connect to the Service Fabric, you need to first specify a certificate for Admin clients to connect to the Fabric. You can do this with a command similar to the following:
- Add-AzureRmServiceFabricClientCertificate -ResourceGroupName $resourceGroupName -Name $clusterName -Thumbprint ABCDEFABCDEFABCDEFABCDEFABCDEFABCDEF3A9A -Admin
- NOTE: DON'T specify the same certificate as both an Admin certificate and as a read-only certificate, otherwise it can confuse the cluster + browser and prevent you from being able to log in as an Administrator!
- In order to log into the Explore via Chrome, you'll need to ensure that you explicitly import your client certificate into Chrome's certificate store, AND configure it for Client Authentication!
- Updating the user configuration of the Fabric by doing things like adding certificates CAN TAKE AN ABSURDLY LONG TIME because adding a certificate requires publication of that certificate OUT TO EACH NODE IN THE FABRIC. And it seems like they don't do it in parallel! That's why you should shorten the timeouts associated with operations in the Fabric. You can do this via the Service Fabric Cluster resource by going to the 'Fabric upgrades' tab in the blade -> 'Advanced upgrade settings'
- The default port in the Service Fabric Service project item in Visual Studio is http:8529. The default port for the load balancer in the Service Fabric cluster template is http:80. See a problem here ? You'll have to change one or the other to ensure they match up so that requests to your load-balancer front-end can actually get through to the machines in your cluster!
- The very next thing you should do after sanity checking your application to make sure it's correctly configured for communications ... secure the fucking thing! Now that you've proven that you can connect via port 80 and everything's mapped correctly, disable it! Move to port 443 and secure all of your requests by default! Not a single thing should go between clients and your cluster unencrypted! Additionally, all traffic between you and your clients should, as a matter of best practice, use message-based encryption wherever possible. See this article. As a hint, you should replace the HTTP mapping rule in your Resource Group template with an HTTPS mapping rule in the load balancer.
- Now that you've got a simple endpoint, start adding authentication and authorization and make sure you're allowing people to do only exactly that which you want them to do! TODO: include link for Service Fabric authentication and authorization!
- If you haven't already, you should absolutely set up automated releases via VSTS (if that's your tool of choice). Ensure that you've made your Service Fabric application upgradeable by placing the following in your Cloud.xml publish profile (or whichever publish profile you may be using):
- <UpgradeDeployment Mode="Monitored" Enabled="true">
- <Parameters FailureAction="Rollback" Force="True" />
- </UpgradeDeployment>
Subscribe to:
Posts (Atom)